Can You Travel with a Hamster? A Comprehensive Guide
Traveling with a pet hamster isn’t as straightforward as it might seem. It requires careful consideration of your pet’s safety, comfort, and the logistics involved.

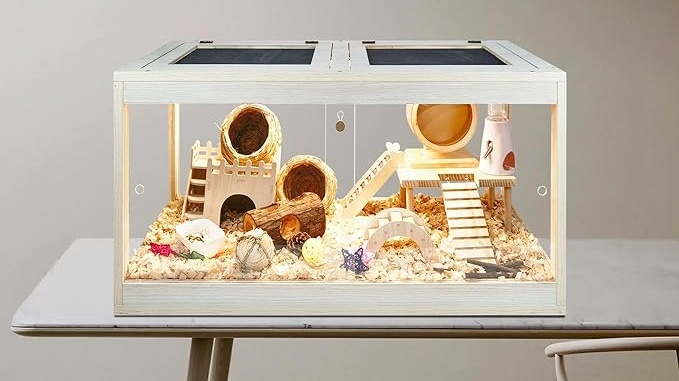
Building a removable lid for your wooden hamster cage is not only a great way to enhance the cage’s functionality but also an opportunity to add a personal touch to your pet’s home.
A well-designed lid simplifies access for cleaning and interacting with your hamster while keeping them safe and secure.
This guide will walk you through each step of crafting a durable, aesthetically pleasing, and practical lid for your hamster’s wooden cage.
A solid design and plan are the foundations of a successful DIY wooden hamster cage lid. It’s where functionality meets creativity.
Measuring your hamster cage accurately is critical for designing a lid that fits perfectly. The shape and size of the lid should complement the existing cage structure. Take into account any extra features like feeding doors or special viewing windows.
If you’re incorporating complex shapes or additional features, consider creating a detailed blueprint or a 3D model to visualize the final product better. Accuracy in this planning phase will save time and resources during construction.
A detailed sketch serves as a visual guide throughout your building process. Consider practical aspects like how the lid will open – will it slide, lift, or hinge open? How will it lock securely? Sketch out places for ventilation and feeding hatches, if needed.

Think about how these elements will work together aesthetically and functionally. Will the lid have a flat or domed top? How will it integrate with the existing cage design? These considerations are crucial in creating a lid that is both functional and visually appealing.
Selecting the right materials and preparing your tools in advance is essential for a smooth building process.
The choice of wood is significant for the durability and overall look of your cage lid. Consider lightweight but sturdy options like birch or maple that are easy to work with and have a pleasing grain.
For hardware, choose rust-resistant hinges and locks, especially if you plan to clean the lid frequently. Stainless steel or coated hardware can offer durability and a sleek look. Remember to choose screws and nails that are the appropriate size for your wood thickness to avoid splitting.
Gathering all necessary tools and materials before you start ensures the building process goes smoothly. You might need a handsaw or a power saw, depending on the wood thickness.
A drill will be necessary for making holes for screws and ventilation. Sandpaper is essential for smoothing edges, and a ruler or tape measure for accurate measurements.
Keep wood glue, a hammer, and a screwdriver handy. If you plan to paint or varnish the lid, include brushes or a spray gun in your tool list.
Proper cutting and assembly are crucial for creating a sturdy and functional lid for your hamster cage.
Cutting the wood precisely according to your measurements is key to ensuring that all the pieces fit together seamlessly. Use a sharp saw for clean cuts and avoid splintering. If your lid design includes complex shapes or curves, consider using a jigsaw.
After cutting, lay out all the pieces to verify their fit before assembly. This is also a good time to drill ventilation holes or cut out sections for a feeding hatch, if included in your design.
Assembly requires accuracy and patience. Start by laying out all the pieces on a flat surface. If you’re using a hinged design, attach the hinges to the lid piece first, then to the cage. For a sliding or lift-off design, ensure that the tracks or grooves are well-aligned and smooth.
Use wood glue for extra stability, and then reinforce it with screws. Check that the lid opens and closes easily and fits snugly onto the cage.

The lid’s removable mechanisms are pivotal in ensuring ease of access while maintaining the security of your hamster.
If using hinges, their placement and installation are crucial. Attach them evenly spaced along one edge of the lid, ensuring they are aligned and level. Consider using at least two hinges for stability. Test the opening and closing action after installation.
The lid should open smoothly without any creaking or resistance. If you opt for a lid that lifts off entirely, ensure the edges are smooth and fit well in the cage to prevent any gaps.
Choosing the right latch or lock is essential to prevent your hamster from escaping. Latches should be easy for you to open but secure enough to prevent accidental openings.
For a more aesthetic approach, consider hidden latches or magnetic locks that are not visible but offer a secure closure. After installing, regularly check these mechanisms for wear and tear, as they are crucial for the safety of your pet.
Proper ventilation is essential for ensuring a healthy environment for your hamster.
When designing the ventilation, balance is key. The lid should allow sufficient air flow without exposing your hamster to drafts. If using a mesh, ensure the wire gauge is small enough to prevent escape but large enough to promote air circulation.
Placement of ventilation holes should be strategic – avoid areas directly above where the hamster sleeps or eats to prevent discomfort from direct air flow.
Incorporating safety into your ventilation design is just as important as airflow. Ensure the edges around ventilation holes or mesh are smooth and free of sharp points.
If the lid has a large ventilated area, consider reinforcing it with additional wood strips to maintain the lid’s strength and integrity. Regularly inspect the ventilation to ensure it remains clear and unobstructed.
Adding finishing touches can significantly enhance the aesthetic appeal of your hamster cage lid.
A thorough sanding is crucial for smoothing out rough edges and preparing the wood for painting or staining.
Choose a non-toxic, pet-safe paint or stain to add color or protect the wood. Applying a finish not only beautifies the lid but also helps protect the wood from moisture and makes cleaning easier.
Allow the paint or stain to dry completely before placing the lid on the cage.
Consider adding decorative elements like wood carvings, stencils, or even a small nameplate with your hamster’s name.
These personal touches make the cage unique but should not interfere with the lid’s functionality. Keep decorations minimal and ensure they are securely attached to prevent any risk to your hamster.
Correct installation and thorough testing ensure that your new lid is both functional and safe.
Carefully align the lid with the top of the cage and secure it in place. If using hinges, double-check that they are tightly screwed in and that the lid opens and closes without issue.
For sliding or lift-off lids, ensure the tracks or edges are smooth for easy operation. The lid should sit flush with the cage walls to prevent any gaps.
After installation, test the lid several times to ensure it operates smoothly and remains stable. Look for any signs of warping or misalignment that could lead to safety issues.
Make any necessary adjustments to improve the fit or movement of the lid. Regularly inspect the lid for any wear or damage, especially the hinges, latches, and locks.

In conclusion, crafting a removable lid for your wooden hamster cage is a project that combines practicality with the joy of DIY. By carefully planning your design, selecting suitable materials, and focusing on safety and functionality, you can create a lid that not only looks great but also enhances your pet’s living environment.
Remember, the key to a successful DIY project is attention to detail and a commitment to quality. With your new skillfully crafted lid, you’ll have easier access to your hamster’s home and the peace of mind that comes with knowing they are safe and secure.


Traveling with a pet hamster isn’t as straightforward as it might seem. It requires careful consideration of your pet’s safety, comfort, and the logistics involved.

Finding the best hamster cage for Syrian hamster is crucial, as these curious, low-maintenance, and independent pets thrive in the right environment. The primary concern

When I began, the task of selecting essentials for a natural hamster habitat was daunting. To ease this process, I’ve assembled an exclusive set of

Have you ever wondered, “Are hamsters happier in bigger cages?” Generally YES. It’s a question that might seem straightforward, but there’s more to it than

Traveling with a pet hamster isn’t as straightforward as it might seem. It requires careful consideration of your pet’s safety, comfort, and the logistics involved.

Finding the best hamster cage for Syrian hamster is crucial, as these curious, low-maintenance, and independent pets thrive in the right environment. The primary concern

When I began, the task of selecting essentials for a natural hamster habitat was daunting. To ease this process, I’ve assembled an exclusive set of

Have you ever wondered, “Are hamsters happier in bigger cages?” Generally YES. It’s a question that might seem straightforward, but there’s more to it than